Configuring Excel templates
Applies to JungleDocs for SharePoint 2010-2019.
For a similar tutorial for JungleDocs for Office 365, click here.
In this JungleDocs tutorial, you will learn how to:
- create a library for Excel document templates
- configure Excel templates by entering field names into spreadsheet cells
- configure Excel templates by adding comments
Create a library for Excel document templates
There are two ways to have a library with an Excel document template: you can either add a content type that has an Excel document template assigned to it, or you can create a library that has an Excel document template. In the following steps, the second method is described.
1. Open your site and click Settings > Add an app.

2. Select Document Library.

3. Click Advanced Options.

4. In the new window, specify the library name and, under Document Template, select Microsoft Excel Spreadsheet.

Excel template editing
1. Navigate to the newly created library and run JungleDocs.
2. On the Document rule, click the drop-down menu arrow, then click Edit template. Leave the template opened and move on to the next step.

3. On the same menu, click Edit Base rule.

4. In the Document template section, click Generate sample document and open the document that downloads. A sample document contains all the content controls that are available for the current content type. You can copy and paste these content controls to your template to automatically fill your document with SharePoint list metadata. For more ways to add content controls, see the following chapter.

4. After making changes to the template, click File > Save.
Adding content controls to the template
There are two ways to add content controls to an Excel template.
Method 1: enter list column names into cells
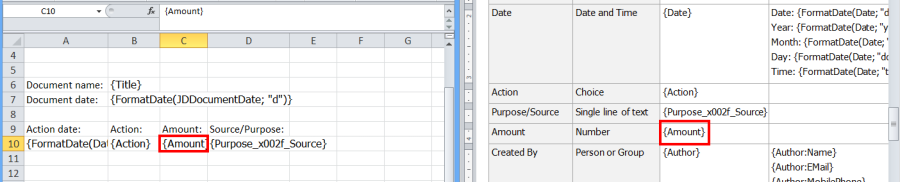
In template cells, you can enter SharePoint list column names in curly brackets (e.g., {SumTotal}). Formatted in this way, column names act as placeholders that are replaced with values from corresponding SharePoint list column when running a rule.
1. Enter placeholders in the cells manually or copy them from a sample document, as in the example below.
Notes
- Documents created in this way are not updateable. If you plan on using the Update Document content from SharePoint feature, skip to the second method.
- It is very important to format the cells correctly. Microsoft Excel requires that cell type is consistent with the data that is put in it. Default cell type is "General" and if all cells are left this way, some data, like dates and numbers, might not be interpreted correctly. To avoid this, Excel cells must be of the same type as SharePoint fields.
2. Right-click on the cell, click Format cells and format the cell accordingly. Dates in our SharePoint are displayed in the m/d/yyyy format, therefore we must specify the same format in Excel. In the example, this format is found under the "Custom" category.

3. Also, format cells containing numbers to the correct number of decimals.

4. After making changes to the template, click File > Save.
Method 2: insert formulas into comments
Another method to configure Excel document templates is by adding a comment on a cell that will be filled with SharePoint metadata. These comments are only visible in the opened document and will not be printed. The comment must be inserted in the following format: =FieldName, where FieldName corresponds to the SharePoint column of the same name. This format stops JungleDocs from parsing the actual comments that might be present in the document.
1. Right-click on the cell and click Insert Comment.

2. Delete the default text in the comment field and enter a formula. In the example, =Title is entered to retrieve the Title column value.

A red triangle in the top right corner of the cell means a comment is present for that cell. Red triangles will not be visible when the document is printed. Here's the example:

And here's the generated document:
